Tattooed Fairy: stage-by-stage photos.
Here's a series of step-by-step photos I took while painting this piece. It's quite a bit more recent than the 'Dinner for Two' sequence and more like a lot of my recent paintings in the way it was done, although I am always experimenting with how I handle the materials. The paint is Gouache - similar to watercolour paint, but more opaque. Scroll down to see the full sequence.
This painting can also be seen in the gallery.
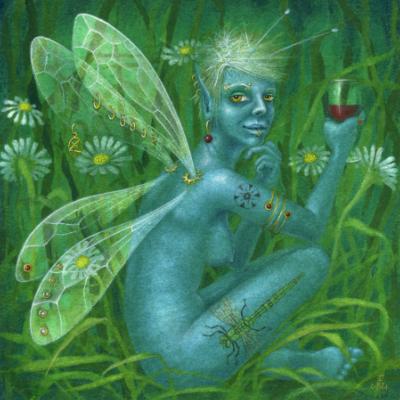
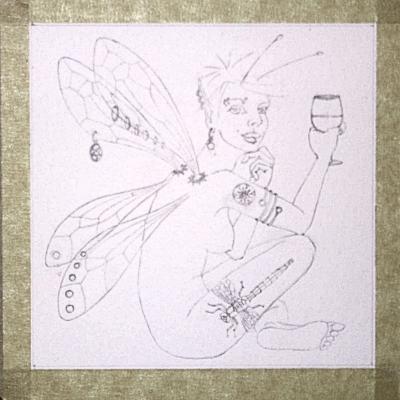
Image drawn out with pencil - generally worked out on cartridge paper first and then transferred using tracing paper onto a good watercolour paper.
The paper here has been stretched - the paper first soaked in water and then taped out wet using gummed tape (the lick-and-stick stuff) so that as it dries it shrinks and ends up under tension. This means when it is wetted again it should stay flat and not 'cockle'. The actual paper I use is usually 'hot pressed' watercolour paper with a weight of 140lb / 300gsm. Soaking the paper does tend to take the edge off the 'hot-pressed' surface, although this is unavoidable.
Around the edge of the paper you can see masking tape - this is not the tape holding the paper down - this is just to create an edge to the painting.
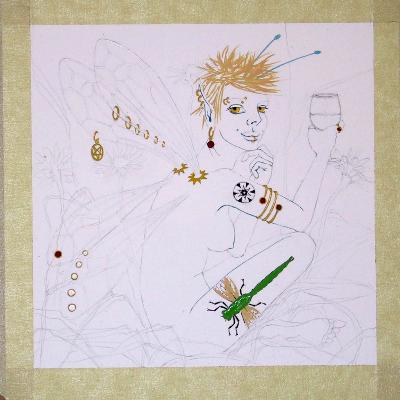
The intention of the next few stages it to stain the paper with colour, so I am using gouache paints, but only those pigments which stain effectively (i.e. when you wash them off again there is still colour there - and you can only find this out for certain by trial and error).
Beginning to paint this way you need to think backwards - details have to go on first - imagine you are painting on glass, and imagine the effect as seen from the other side of the glass.
I've used fairly thick paint for the details, so now when I cover these bits with more paint the original paint layer is still there, protecting what I first painted from any other colour soaking through. The more 'filler' a paint has the better it seems at this protective task - i.e. the opaque whitish paints are better at it than the dark and/or translucent ones. The underneath layers have to be completely dry as well, before more paint is added on top, and you need to add more paint quite swiftly and then leave it alone rather than stirring the paint round with your brush - which will lift the paint underneath.
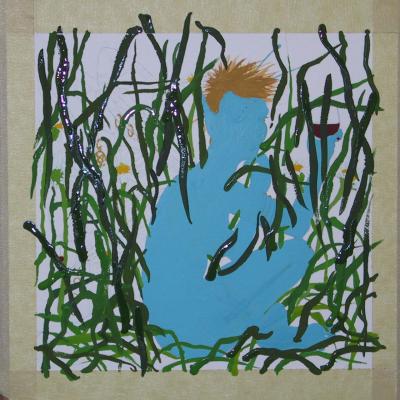
Here I am continuing to paint backwards - having put in the details and foreground I begin to add the middle distance areas - although it's all relative as in this painting it's all pretty much foreground.
About brushes - sable watercolour brushes hold a lot more paint, but I find the synthetic brushes much better for when you want accuracy and tiny details.
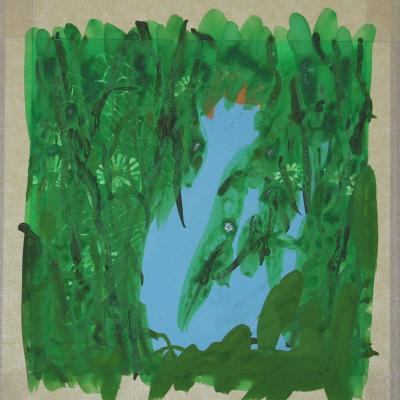
Now that I've covered the entire surface in paint you can also see where I painted the daisy petals and the veins on the fairy's wings in white (before the green went on) - they didn't really show up in the photograph before.
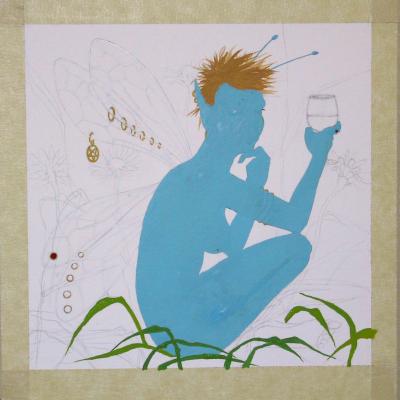
Although the surface is already covered in paint I have added some 'Prussian blue' on top - some of it on the surface of the actual painting (it will soak through a little) but I've also painted on the masking tape around the painting - this becomes useful later. I use Prussian blue a lot for shadows - it's a lovely dark inky blue that's quite translucent (unlike most gouache paints, which tend to be opaque).
All the previous stages involved putting paint on. Now I've begun to take some off again... For this, I've first dried the whole thing completely, then I've used a big soft mop-like brush and a lot of water and scrubbed it over the surface. The paint re-dissolves and lifts and I've then mopped up the paint and water with a lot of kitchen paper (or anything absorbent as long as it doesn't fall apart and leave bits on the painting) before drying it rapidly with a hairdryer. I say 'scrubbed' - but in fact the brush I used is quite soft on the surface of the paper - the real scrubbing bit comes later.
You can see the details I painted begin to re-emerge.
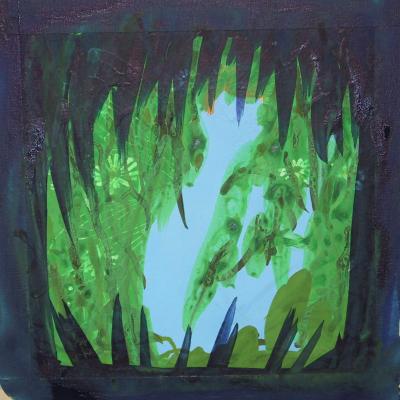
This it the painting after a second round of this washing and drying process - there is actually little paint left on the paper - most of what you see is a very small amount of paint staining the paper. This is a slight exaggeration, as if I really scrubbed at it I could bring more paint off, but compared to what I had two photographs ago most of the paint is gone - but notice the Prussian blue paint that I put on last - it's still there around the edges and about to come in useful.
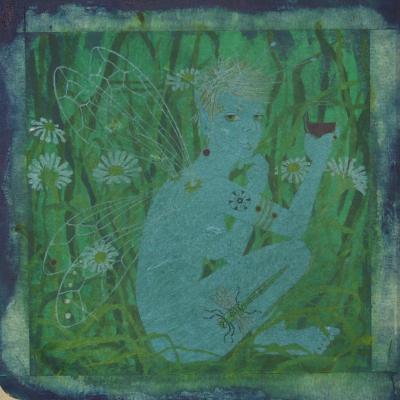
This it the picture after yet another soaking. This time I went over the painting with the large brush and water, but I didn't remove all the dissolved paint, instead I let some of it sit on the surface of the painting and dry again like that. Basically the difference between this stage and the previous one is a 'mucky' layer of paint covering the surface. This is where I particularly like to use Prussian blue (although I could have used a different dark colour) as its translucency is very useful - but it also stains the paper extremely effectively, so use with caution!
I'm continuing to remove paint, but more selectively. After thoroughly drying the painting with a hairdryer following the previous stage, I have again wetted the surface - with very clean water - but this time using a small, stiff 'hogs hair' brush - the sort usually used for oil or acrylic paints. Now I am going to scrub the surface a bit and the hogs hair brush will remove paint in a more selective way - scratching away at only the areas I want it to lighten. At this point I spend a lot of time wetting areas, scrubbing at them, mopping up the excess water and paint, and drying the paper again. The whole process repeated over and over until I have brought up quite a lot of highlights.
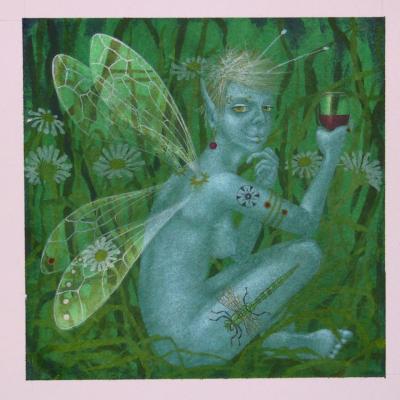
Between this image and two pictures back I have only been removing paint (the masking tape round the outside is also gone, leaving a nice clean edge). I have a collection of hogs hair brushes that I use for this, some of which I've cut the bristles very short on, to give me a small and accurate 'scrubbing brush'. The painting is beginning to take shape, finally, but still needs definition - for this final stage I will stop removing paint and actually add some for a change - that's the next photo.
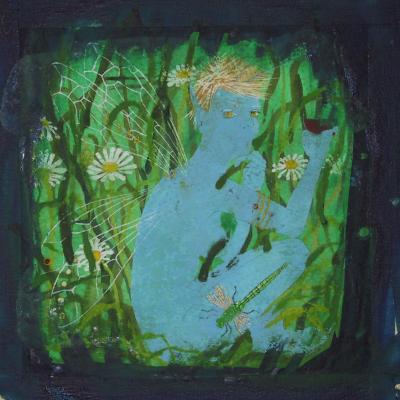
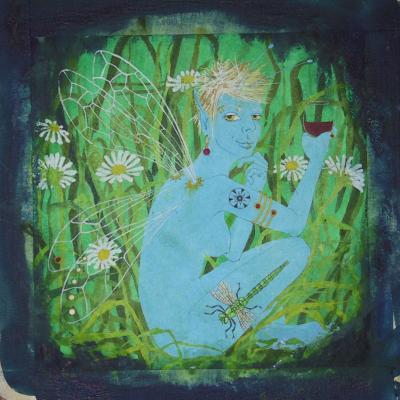
Here is the finished painting. Between this and the previous picture I have added highlights and shadows, restored some colour that wasn't strong enough after the repeated washing, and painted in some new details.
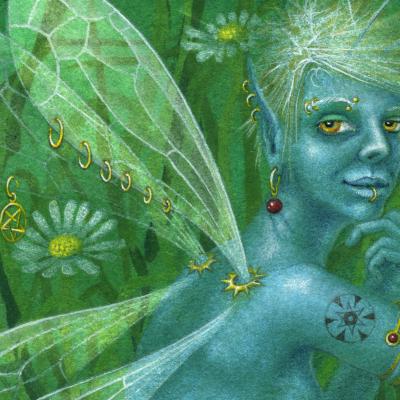
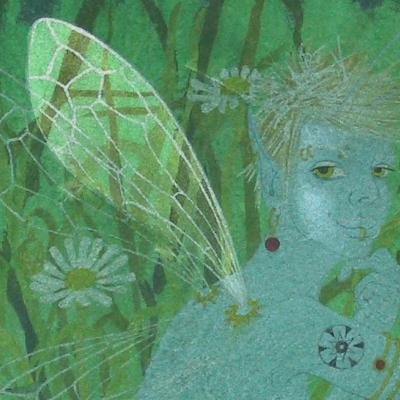
Close-up section of the final piece. In this painting I did actually use a few coloured pencils for the details, although I tend to stick to paint now as it's easier to get strong colours this way.